USB3 Vision
- How can I set exposure time on StViewer?
-
Updated:
Tag:The camera has two exposure modes
OFF: Exposure time is “1 / frame rate setting (second)”, which is longest exposure time to maintain set frame rate.
The exposure time is changed based on frame rate.
Timed: Exposure time specifies by exposure time setting.
Please uses “Timed” exposure mode to specify exposure time manually.The exposure time can be set by below step.
Exposure time sets manually:
1. Selects “Timed” at “ExposureMode” under “AcquisitionControl” under “RemoteDevice”.
2. Sets exposure time at “ExposureTime” under AcquisitionControl” under “RemoteDevice”.Exposure time specifies by frame rate (exposure time is “1 / frame rate (second)”):
1. Selects “OFF” at “ExposureMode” under “AcquisitionControl” under “RemoteDevice”. - The frame rate dose not increase even reduce resolution by ROI function on StViewer.
-
Updated:
Tag:It is possible to not increase frame rate depending on frame rate setting or exposure time setting.
The exposure time setting has to be set less than “1 / frame rate setting” (second).Please check below settings to increase frame rata.
1. It is necessary to do NOT acquire image.
2. Sets target frame rate at “AcquisitionFrameRate” under “AcquisitionControl” under “RemoteDevice”
3. Selects “OFF” at “ExposureAuto” under “AcquisitionControl” under “RemoteDevice” to disabled auto exposure function.
Selects “OFF” or “Timed” at “ExposureMode” under “AcquisitionControl” under “RemoteDevice”
Sets exposure time that is less than “1 / framer rate setting” at “ExposureTime” under “AcquisitionControl” under “RemoteDevice” when selecting “Timed”.
4. Please check frame rate after acquiring image. - USB camera does not appear on StViewer.
-
Updated:
Tag:StViewer cannot use USB2.0 or USB3.0 camera. USB3 Vision camera can use with StViewer.
USB3 Vision camera may not recognize, if driver for USB3.0 host controller on PC does not install, or USB bus power does not enough for USB3 Vision camera.
Please check latest driver for USB3.0 host controller on PC.Some USB3 Vision cameras are recommending to use external power supply through 6 pin connector.
- How can I confirm frame rate on StViewer?
-
Updated:
Tag:The frame rate and image transferring speed are displaying at lower right of StViewer.
Frame rate: XXX[fps]
Image transferring speed: XXX[Mbps]Please enabled “Status bar” display by below steps when frame rate and image transferring speed do not display at lower right of StViewer.
1. Selects “View” at upper left of StViewer.
2. Selects “Status Bar”. - The image cannot acquire with SDK based program.
-
Updated:
Tag:Please acquires image with viewing software of SDK, to make sure camera and environment do not have issue to acquire image.
The SDK based program has some issue, once confirmed camera and environment do not have issue with viewing software of SDK.
Please contact technical support with referenced sample program name, details of issue and error information. - How can I save camera settings onto camera with StViewer?
-
Updated:
Tag:The camera settings can save onto with UserSet function.
Please follow below procedure for UserSet function.1. Select “UserSet1” at “UserSetSelector” under “RemoteDevice” – “UserSetControl”.
2. Select “Execute” button at “UserSetSave” then current camera settings save onto UserSet1.When select “UserSet1” at “UserSetDefault” under “RemoteDevice” – “UserSetControl” then camera starts with camera settings on UserSet1.
- How can I save image with specifid number of bits (8bits, 10bits or 12bits) with StViewer?
-
Updated:
Tag:8bits image saves with default camera setting.
Please change the pixel format when saving 10bits or 12bits image.
Registered Image or Preview Image is selectable for image saves at StViewer.
Registered Image is image with selected Pixel Format of GenICam.
Preview Image is image with selected Destination Pixel Format (Preview image format of StViewer)
When saving image with “Save” icon, preview image saves.
■ Monochrome camera
Saving “Mono8 (8bits)” image with default setting.
Please follow below procedure to save other than “Mono8 (8bits)” image.
Change “Pixel Format” under “Remote Device” – “Image Format Control” after stop acquiring image.
Start acquiring image.
Select right click on image of StViewer then select “Save” – “Registered Image”.
Select image file format then save image.■ Color camera
Saving “BayerRG8 (8bits)” image with default setting.
Please follow below procedure to save other than “BayerRG8 (8bits)” image.
Change “Preview Pixel Format Mode” under “ImageDisplayWnd” – “View Control” to “Manual” after stop acquiring image.
Select “Destination Pixel Format” under “Image Format Control” under “PixelFormatConverter”.
Start acquiring image.
Select right click on image of StViewer then select “Save” – “Preview Image”.
Select image file format then save image.
Please select “Registered Image” when saving BayerRG8 to 12 image.
The image can save only CSV data or straw data (Sentech original raw data format).
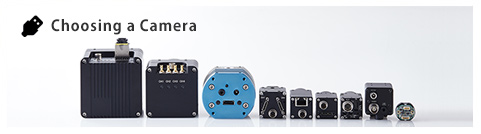
Please refer “SaveAndLoadImage” sample program for conversion from straw data. - Which interface camera do you recommend?

-
Updated:
Tag:The recommend interface camera is different based on how does the image acquire. (with PC or without PC)
When the image acquiring with PC
When the image acquiring without frame grabber board
GigE Vision supports up to 100m cable.
USB3 Vision can use with USB bus power to achieve one cable solution.
USB2.0 can use with USB bus power to achieve one cable solution.
When the more stable image acquiring with frame grabber board
Camera Link is available from “Low resolution / high speed” camera to “high resolution / high speed” cameras.
CoaXPress can be faster frame rate compare with same resolution of Camera Link camera.
Opt-C:Link supports up to 100m cable.
When the image displaying without PC (camera connects to monitor directly)
HD-DVI can be connect to monitor directly with HDMI cable.
3G-SDI / HD-SDI can be connect to SDI supported monitor directly with BNC cable.
TV format can be connect to monitor directly with BNC cable. - What kind of image acquisition software is available for USB3 Vision camera?
-
Updated:
Tag:We provide “SentechSDK Package”. SentechSDK Package includes Viewer software “StViewer”.
When using USB3 Vision camera and “USB2.0 or USB3.0 camera” in same system,
please use “StCamUSBPack” software for Windows environment, “V4L2 USB driver” for Linux environment.
Please download the software from USB Software download
Also USB3Vision camera uses with USB3 Vision interface supported Vision software. - What kind of USB3 Vision camera is available?
-
Updated:
Tag:0.4M to 12M CMOS based USB3 Vision cameras are available.
Please refer below linked page for details of USB3 Vision cameras.
USB3 Vision camera information
* USB3 Vision camera does not include lens and USB cable.
Please refer accessories for USB camera, cable manufacture website and lens manufacture website to select accessories.